Tuesday, May 18, 2010

Show Multiple Time Zones on Your Outlook Calendar

Your company is in multiple locations and multiple time zones so your calendar should be too.  Don’t worry, with Outlook its easier than it sounds.  Just follow the directions below and you can make sure that when you’re sitting in Durham, North Carolina and scheduling a meeting with your colleague in California, or Beijing for that matter, that the time is convenient for all of your invitees.

1. Open Outlook and click on Calendar to show your schedule.

image2. Click on Week (this is located above the calendar and just below the tool bar).  You need to be in a weekly or daily view to see multiple time zones.  Unfortunately, multiple time zones can’t be displayed in the monthly view.

image3. Right click anywhere along the left border of the calendar (where the hours of the day are displayed) and select Change Time Zone.

image4.  Check the box that says Show an additional time zone.  Now you will be able to select a second time zone to be displayed on your Outlook calendar.  You can also add labels like ‘HQ’, ‘Corporate’, or a city or country name.  It’s up to you.

image

5. Click OK to save your settings.  Now your calendar will display both time zones when you are in either weekly or daily views, as shown below.

image Congratulations, you now have an international or at least inter time zone calendar.  I hope that you find this useful as you try to schedule meetings with other locations.

Monday, May 3, 2010

The Ultimate Mother’s Day Card

It’s that time of year again and if you’re like me your scrambling around to find the perfect Mother’s Day gift and card.  I can’t help with the gift part of the equation but I can help in making the ultimate Mother’s Day card.

Snapfish (www.snapfish.com) offers custom Mother’s Day cards for a whopping $1.99.  They also offer a wide array of products like key rings and coffee mugs that you can customize with your pictures as great gifts for the mom in your life. 

What makes this the ultimate Mother’s Day card is that its customized with your pictures as well as your text on both the interior and the back of the card.  Your mother or wife will get such a kick out the card that she might frame it, like my mother did, or add it to her most treasured keep sakes, like my wife did.  Of course, the pictures I used were of my children, not of me.

So hurry up and get your photos together and get your Mother’s Day card made.  And, at $1.99 a card don’t forget grandma!

Here’s my card for Grandma

image

Tips for creating your card

  • Create a new folder on your computer and copy the digital photos you’d like to use for the card to the folder.  It’s good to have a few extra photos to see how everything looks once the card is put together.
  • Use 2-day shipping & handling.  It’s currently the same price as standard shipping & handling, which is 3-5 days.
  • Don’t forget to add text on both the inside and to the back of the card.  Use something like “Made just for Mommy” or “Made with love” on the back of the card.
  • Snapfish has a live chat option.  If you get stuck or have a question you can get help very quickly by using chat.
  • Take a look at the customizable gifts available.  You may find something that the mother in your life would love.  Then all of your Mother’s Day shopping would be complete in one stop and who doesn’t like that.

Wednesday, April 28, 2010

How to use Undisclosed Recipients in Outlook 2007

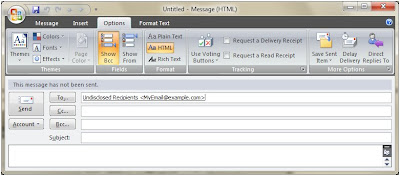
Have you ever noticed how nice and professional it looks when an email comes into your inbox that only shows “Undisclosed Recipients” in the To field? It looks nice but no one seems to know how to send like that. Well that is about to change!

Outlook 2007
  • Click New Message
  • Type Undisclosed Recipients followed by a space and your email address in braces (these things < >). See below for example. It is important to include your email address in braces after undisclosed recipients so that your email provider doesn’t see this as spam.

  • Next, click on the Options tab in order to utilize blind carbon copy, or more commonly referred to as Bcc. Click the Show Bcc button in order to bring that option to your message.

  • Enter the email addresses that you want to send this message to in the Bcc field.
  • Enter the appropriate subject in the Subject field (You’ve made your email look professional with the undisclosed recipients options, don’t frustrate the people receiving your note by not including the ever important subject).
  • Enter your text and send away.
Your recipients will be impressed with the Undisclosed Recipients option and happy that their personal email addresses are not being exposed to the entire Glenwood PTA. It only takes an extra minute to use this feature and it will keep your friends and associates happy because not only will they not have to worry about getting spammed as a result of your email, they won’t have to view everyone else’s email address on the message, which can mean scrolling through all of the visible email addresses when reading email on a smart phone, such a Blackberry or iPhone.

Monday, February 16, 2009

Shortcut for browsing the web

Here's a good one to start with. Have you ever noticed that about 90% of the web sites you navigate to start with www. and end with .com? Well there is an easy way to include both of them with a simple keyboard shortcut.

Say you want to navigate your web browser over to www.cnn.com because you heard about a breaking story. You would simply need to type cnn in the navigation bar in Firefox or Internet Explorer followed by the Control (Ctrl) and the Enter key. This keystroke will add the www. and .com to cnn or any other address automatically. Try it out!

Here is a listing of the keystrokes for easy web browsing

Ctrl + Enter to add www. & .com (for example www.cnn.com)
Shift + Enter for .net addresses
Ctrl + Shift + Enter for .org addresses

Unfortunately, I have not found a shortcut for .edu addresses, which is a real shame since I work at a .edu. Please let me know if you're familiar with a .edu or any other keyboard shortcut to make web browsing faster and more efficient.